
Easily adjusting the pulse width
Variable pulsed current offers a wider range of current forms
I own a pulsed current device with a variable pulse width. How do I proceed?
Many iontophoresis users will try to reach a pulse width of 100%. On a surface level, this logic seems to make perfect sense: 100% is always better than 50%. Right? Unfortunately, no. TOTALLY WRONG!
The basics:
Higher pulse width ⇉ "harder" current feeling.
Example:
While using the same current settings in volt or mA (e.g. 30 volts or 15 mA):
Pulse width of 50% ⇒ gentle (easier to endure, basically unnoticeable).
Pulse width of 100% ⇒ hard (difficult to endure, treatment comfort varies highly between users).
The pulse width settings in between those two extremes show an incremental increase from a gentle current to a very rough and direct current. There's no iontophoresis rule without an exception: The last step from 90% to 100% pulse width feels much more intense than any change between the lower pulse widths. Some users find this step more intense than a jump from 50% to 90% pulse width.
The last step from 90% to 100% also represents the change from gentle pulsed current to conventional direct current.
Iontophoresis with pulsed current: gentle current
Iontophoresis with direct current: intense current!
We often get questions along the lines of:
Is it better to use a pulse width of 100% at 10 volts than 50% at 15 volts?
To answer this question, let us take a closer look at the way your iontophoresis device measures and displays your values. For devices with a peak current display, the answer is yes; for devices with an average current display, the answer is no.
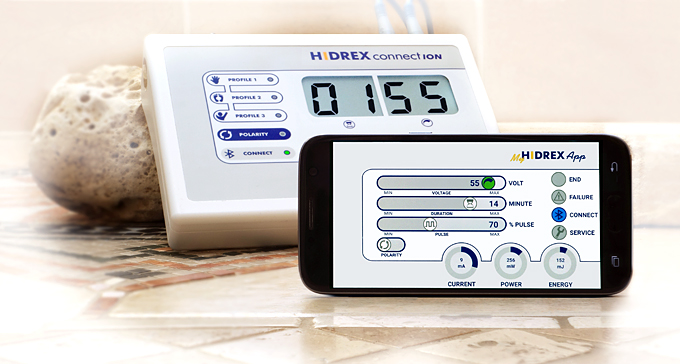
Hidrex connectION:
A higher display value should generally be aimed for if the current sensation and the condition of your skin allow it - even if you have to decrease the pulse width to achieve a higher current.
This is one of the reasons many users can finally realize a higher voltage!
An adjustment of the pulse width allows many users to:
- Achieve higher currents and therefore reduce the treatment time
- Achieve a more comfortable treatment feeling
- Minimize skin irritations
Profit from all three improvements at once
Select cool pulse widths - adapt to skin type and thickness/strength
No secret, straight ahead:
Many users set the following heart rate values
hands: 70% - feet 90% - armpits 60% - other areas: 50%
Setting the pulse width
Find out the best pulse width for each skin area.
There are 3 possibilities:
- Start with the lowest pulse width
- Start with the highest pulse width (not recommended)
- Start with the setting that is preferred by most users
Tip: If you want to be on the safe side, start with the smallest pulse width.
Starting with the lowest pulse setting
Keep in mind to listen to your body and monitor the state of your skin.
Read the user manual! It's better to check your skin condition one time too often when making major changes to the settings. Beginners in particular should check their skin condition repeatedly during the therapy.
Slowly increase the current, using the lowest pulse width, until you feel a tingling sensation.
Should you reach the power limit or the maximum current level of your iontophoresis device without feeling a tingling (CL or Current Limit = current cannot be increased further), you can increase the pulse width to the next value. Check the condition of your skin immediately after - is everything okay/no redness?
If so, increase the pulse value one step at a time until you reach a point at which you cannot tolerate the same current setting. This is a sign to decrease the pulse width to the previous level.
However, this process only applies to iontophoresis devices which display the voltage peak values, like the Hidrex connectION. If you own a Hidrex connectION, please note:
At a pulse width of 50%: if a current of 60 volts is not achievable due to the intense tingling, the setting of 50% is correct.
At a pulse width of 60%: if a current of 60 volts is not achievable, the previous pulse level is preferable. (⇒ Detailed instructions for the Hidrex Connection - find out how to set the pulse width).
If your iontophoresis device displays voltage averages, as in the case of the Hidrex PSP1000, the pulse width at which the device achieves the highest currents without tingling or skin irritations is likely to be the most appropriate.
Starting with settings that are preferred by most users
Keep in mind to listen to your body and monitor the state of your skin.
Read the user manual! It's better to check your skin condition one time too often when making major changes to the settings. Beginners in particular should check their skin condition repeatedly during the therapy.
Slowly increase the current, using the lowest pulse width, until you feel a tingling sensation. Now you can start the therapy!
Normal pulse settings
The following initial values can be used to figure out the treatment feeling that fits you best:
Hands: 70% - Feet: 90% - Armpits: 60% - Other areas: 50%.
For most users, these values are optimal.
Should the current feel too rough, the pulse width is adjusted downwards until you achieve a good treatment feeling.
Should the current feel too soft, and you are certain that you can withstand a higher pulse width at higher currents, feel free to increase the pulse width as a test.
Why not start with the highest setting?
Starting directly with the highest pulse width does not make sense to us, nor do we recommend it. However, this method is sometimes described by others, e.g. on internet forums.
Hidrex ConnectION - setup
Variable pulse setting shown in detail, using the Hidrex connectION as an example
Keep in mind to listen to your body and monitor the state of your skin.
Read the user manual! It's better to check your skin condition one time too often when making major changes to the settings. Beginners in particular should check their skin condition repeatedly during the therapy.
Slowly increase the current, using the lowest pulse width, until you feel a tingling sensation. Now you can start the therapy!
Start with the lowest pulse setting, i.e. 50%. To do this, press the PULSE button on your device for a few seconds after switching it on. Select P-50 (50% pulse width) by pressing the button shortly several times.
The Hidrex connectION shows the maximum applied voltage on the display. By connecting the device to the phone app, you can see the mA level. In this way, you can easily see which pulse setting allows you to reach the highest average current. This setting is the most effective level.
If you wish to optimize your settings in a manual mode without using the app, use the value of 54 volts as a guide. If you cannot reach 54 volts with your current pulse width due to the intense tingling or any potential skin irritations, this is your sign to select a lower pulse width. Now you should be able to increase the current.
If you feel a strong tingling with a pulse width of 50%, you don't need to make any adjustments to your pulse width. Switching up to 60% will usually result in a rougher treatment feeling at lower currents. You should simply stay at 50%.
If you are certain that you can endure a stronger current (the Hidrex connectION has reached the power maximum, showing CL* or a current value of 60), you can increase the pulse width.
Repeat the process until the voltage you can tolerate stays below 54 volts in your current pulse width setting.
Then, decrease the pulse width by one step and you have found your correct setting.
*(CL or Current Limit=current cannot go higher)
Conclusion: the iontophoresis dosage with the Hidrex connectION
A pulse width of 80% and a current of 60 volts achieves a higher dose than a pulse width of 90% and a current of 53 volts.
A pulse width of 80% and a current of 60 volts achieves the same dosage as a pulse width of 90% and a current of 54 volts.
Methods in which iontophoresis devices measure and display the values
An often repeated statement reads:
Direct current devices are better because pulsed current delivers only half the current. Therefore, iontophoresis becomes more effective with a direct current, since it delivers twice the power.
On a surface level, this statement is correct, but it obscures the finer details.
For our example, let us envision a simple switchable device that offers both 50% pulse width and 100% direct current, as well as 60 volts / 30 mA.
This device delivers an average maximum of 15 mA when it is set to pulse mode. Let us compare this "halved power" with the same current of 15 mA in direct current mode.
In order to achieve the same iontophoresis dose in the same time, the user has to reach a direct current higher than 15 mA. If this is not possible, the user should stick with the pulsed current, which is more comfortable and unlikely to irritate the skin.
Even just an increase of the iontophoresis dosage by 20% would require a current level of 18 mA.
A direct current at 18 mA would feel extreme, even when treating the feet. The treatment feeling would be especially rough on the hands, and the underarm treatment would be out of the question entirely.
However, if the pulse width can be increased to 90%, the effect would be very different: this would equal 60 volts / 30 mA x 90%!
This is an average of 54 volts or 27 mA! Compared to the pulse width of 50%, these values offer a very high efficiency with a current that can be easily tolerated, e.g. when treating the feet. A comparison with the direct current shows that a level of 27 mA would be almost impossible to tolerate.
Two common procedures are used for the measurement:
- Displaying the peak values (Hidrex connectION and Hidrex classicION)
- Displaying the average values (Hidrex PSP1000 and Hidrex GS400)
The pulse width factors into the calculations. A direct current equals 100% pulse.
The calculation is simple:
- Peak value display = peak value x pulse width = averaged real voltage or current
- Averaged display = no calculations necessary, the screen shows the real voltage or current
Iontophoresis and variable pulse current - VPS - Practical examples
Some simple examples:
Peak value measurement method:
Example 1)
10 mA direct current compared to 20mA at 50% pulse width.
Answer: 20mA PC × 50% = 10 mA average. Compare this value to 10 mA DC = 10mA × 100% = 10mA real current.
Solution: Both currents are equal.
Example 2)
10 mA DC compared to 20mA PC at 90% pulse width.
Answer: 20mA PC × 90% = 18 mA average. Compare this value to 10mA DC = 10mA × 100% = 10mA real current.
Solution: averaged PC compared to DC current 18:10 ⇒ pulsed current is 80% higher.
Example 3)
10 mA DC compared to 15 mA PC at 60% pulse width.
Answer: 15mA PC × 60% = 9 mA average. Compare this value to 10 mA DC = 10mA × 100% = 10mA real current.
Solution: averaged PC compared to DC 9:10 ⇒ pulsed current is about 10% higher.
Averaged value measurement method:
Example
10 mA direct current compared to 20mA pulsed current at 50%.
Answer: 20mA PC = 20 mA average = real current. Compare this value to 10 mA DC = 10mA real current.
Solution: 20mA pulsed current compared to 10 mA direct current - pulsed current is twice as strong.
We don't think there is any need for more examples of the averaged method, which is very simple.
Our VPC IONTOPHORESIS Devices
VPC Iontophoresis device
variable pulsed current
In Steps Of 10
Or choose a simple monthly rent